Home / eaSheets Homepage / eaSheets Help / Editing EA data / Smart Sheets
Smart Sheets
Elements and connectors
In an EA model, the relationships between things are often just as important as the things themselves.
With an eaSheets Smart Sheet you can open a sheet showing not just the fields and tagged values of each element, but also it’s connections to everything else:

Opening a ‘Smart Sheet’
To open a Smart Sheet, find a package in EA, and choose Specialize / eaSheets/ Open Smart Sheet
eaSheets will then:
- Open the sheet with all the fields and tagged values you have used, exactly as with a normal sheet
- Examine each element in the package, and find out what relationships it has with other elements
- For each relationship type, and target element type, eaSheets will add a new column, and populate the contents of each cell with the name of the related element.
Example
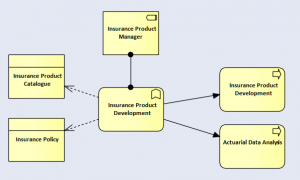
If your model has some data like this:

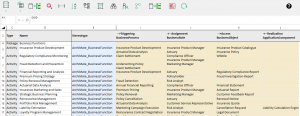
Then when it appears as a row in a Smart Sheet, it will look like this:

Interesting that the diagram and the row in the Smart Sheet are slightly different.
The sheet shows that the ‘Insurance Product development’ business function is related to two business roles:
- Insurance Product manager and
- Actuary
But the diagram just shows one – because diagrams only show a view of the data in our models, not all of it. Perhaps since we drew the diagram we have added some new data, but forgot to update the diagram.
So the Smart Sheet always shows the very latest data from EA: fields and tagged values AND all the current connections.
Editing A Smart Sheet
You can use a Smart Sheet to edit the relationships between elements:
- To add a connection to an existing element, either:
- right click in the appropriate cell, and choose ‘add related element‘. Then choose an element from the dialog. This will create a connection, of the type and direction which is correct for this column, between the element for this row, and element you chose. Note the EA will only let you choose a element of the correct type to connect to.
- Just type the name of the element you would like to connect to.
eaSheets will look for an element with that name, and with the element type and stereotype specified by the column.- If it finds just one element with the right name, type and stereotype, then it will create a connection to that element.
- If it doesn’t find an element, it will create a new one, and connect to that
- If it finds more than one element with the same name, no connector will be created, and ou will see an error message. This is a really quick way of creating lots of elements, and lots of connections to those elements, just by creating a Smart Sheet with the right columns, and pasting in the names of the elements you want.
- To create a connection to a new element, as above, just type the name of the element into the cell, either separated by a comma, or on a new line, and eaSheets will create an new element(s) with the appropriate names.
- To delete a connection, just remove the name of a related element from the Smart Sheet column.
Before deleting any connectors, eaSheets will always warn you, just in case you make a mistake, and try to delete lots of connectors.
Changing the focus
Right click on a related element cell to open and edit a separate sheet on those elements. Then change what you can see by selecting Show/Hide columns ![]() . Applies to cells with single or multiple related elements.
. Applies to cells with single or multiple related elements.
Tips and tricks
If you open a Smart Sheet on a package or diagram, eaSheets will show you the forward and backward links of each element. If those elements are linked to each other, then adding or deleting connections will give surprising results, just because each connector is represented in two cells. In this case, you should remove the connector column in the reverse direction, then you can happily add and delete connections, as above.