Home / eaSheets Walk-through (1) – open, edit and validate / Getting Started / eaSheets Walk-through (1) – open, edit and validate
eaSheets Walk-through (1) – open, edit and validate
If you want to know more about all the great things you can do with eaSheets, this is the place to start.
We will guide you though the main features of eaSheets and give you lots of links where you can get more help.
For these examples, we will use data from the example model, which you can download from this website. See eaTeamworks example model.
Note: most of the data we will use here has been baselined in the parent package, so that you can easily go back to the initial state of all the data, and re-run the walkthrough.
Login to the example model as user: Admin – no password
Opening a Sheet
The easy place to start is to just open a sheet on an existing part of your model.
To reset this part of the walkthrough, restore the Sheet Data 1 package to V1 ‘start of walkthrough’.
- For a simple list of elements,
- open eaSheets.eaSheets examples.Sheet data 1 .Requirements,
- right-click on the package ‘Requirements’, and choose Specialize / eaSheets / open elements in sheet
- This will show you the list of Requirement elements in the package, and all the EA fields and tagged values which those elements are using.
- For a smarter list
- Open the same package, only this time choose Specialize / eaSheets / Open Smart Sheet
- Notice that now, you can see the names & description, plus tagged values PLUS information about related elements. In this case, the business stakeholder(s) connected to each requirement
- Other kinds of list
- Attributes of a class
- Open the ‘Sheet data 2’ package in EA, and find the ‘Customer’ class
- choose Specialize / eaSheets / open in sheet / Attributes
- This will open all the attributes of the ‘Customer’ class
- Attributes of a class
Editing data in a Sheet
Using the same Sheet data 1.Requirements package, open a Smart Sheet, and try:
- Create new tagged values, or populate other EA fields
- Add a new column, and type the name of the new tagged value into the shaded cell
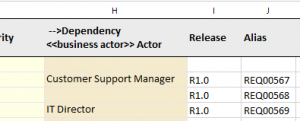
- Or you can type the name of an EA field, like Alias or Status, into a new column, and input data for each element. As long as the column name is exactly the same as the standard EA field name (case-sensitive), this data will will not create a new TV, but will be added to the existing EA field.
- Add a new column, and type the name of the new tagged value into the shaded cell
Because this is a Smart Sheet, the columns which show the names of related elements have special behavior.
- To connect a requirement to an existing Business Stakeholder, just type the name of the business stakeholder into the appropriate cell
- If the stakeholder exists anywhere in the model, when you save the sheet, eaSheets will create a connection between the appropriate Requirement and Stakeholder.
- You can create multiples, either by separating the stakeholder names with a new line, or with a comma
- If the stakeholder doesn’t exist, eaSheets will create a new one, and link to that.
- If the stakeholder exists anywhere in the model, when you save the sheet, eaSheets will create a connection between the appropriate Requirement and Stakeholder.
- If you edit or delete the contents of one of these relationship cells, eaSheets will delete and re-create connectors – but it will warn you before it does any deletes. This does not delete the related elements.
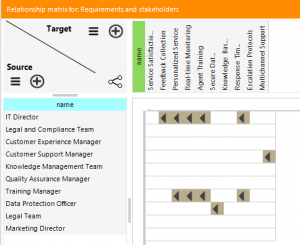
- Once you have done some adding and deleting of connections, check what you have done by opening the Model Expert matrix: just double click the <<matrix specification>>Requirements and stakeholders element to open the matrix.
- If you wish to delete elements from your model, select the element row of the element you want to delete and just type #Delete (this is case sensitive) into the ‘Type’ column and the element will be deleted from the model.
- Note: this is a permanent delete, and cannot be undone – that’s why we make you type #Delete next to each element, just so you think about what you are about to do.
- If you want to try any of these deletes again, just restore the ‘Sheet Data 1’ package from it’s baseline.
Importing data
eaSheets, and especially Smart Sheets, make importing of data really easy.
To import some new data – in this example, some Archimate Business Functions, and their related data – find the Business function.xlsx Excel spreadsheet which came with the eaTeamWorks example model. This is the source data for the import.
In the example model, find the package eaSheets.eaSheets examples.Architecture.
We will try to import some new Business Functions into this package. These new Business Functions will also import their connections to other elements which are already in the model, and in a few cases, create some new elements, and link to them.
- Open the ‘Template elements’ folder, and find the diagram of the same name. This is the shape of data we want to import: a business function, which is connected to some (or none) business roles, business process and business objects, each with a different connector type. But we don’t want to confuse things by needing to know anything about those connector types: we have said all we need to in this simple ‘template’ diagram
- Create a folder called something like ‘temp’ into which we will put the new data
- Move the element ‘Template Business function‘ into the temp folder
- Open the temp folder as a Smart Sheet
- You will see that the Smart Sheet opens with columns for the related elements: roles, objects and processes as well as the fields and tagged values which each business function needs.
- We’re now ready to copy & paste the data from the source Excel spreadsheet
- Copy all the Business Function names & descriptions from Excel, and paste it into the Smart Sheet
- Do the same for the three columns of related data: the ‘Related Business Process’, ‘Roles’ and ‘Uses Business Object’ columns – don’t copy the headers.
- Make sure the right related data goes into the right column
- In the ‘Value and Importance’ sheet in Excel, copy the values for those two pieces of data, into the ‘Value’ and ‘Importance’ columns in the Smart Sheet
- If the ‘Description’ column is too wide, choose ‘Word Wrap’ from the menu bar, and resize the column
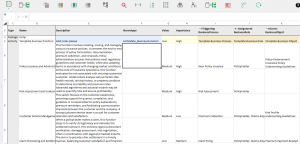
- Your sheet should look something like this:
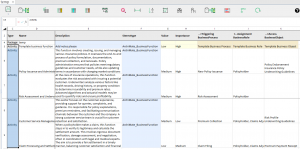
- Now you can tell sheets what kind of element to create: just swipe/copy the Stereotype and Type columns: you sheet should now look like this:
- Now just import the data into EA
If you look in the ‘temp’ folder you will see
- The 4 new Business Functions
- One new Business Role (Claims Adjuster) , and one new Business Object (Underwriting Guidelines). These were referred to by some of the new business functions, to eaSheets created them, and connected the appropriate business function to them.
- For the existing roles, processes and object, eaSheets just created links to the existing elements:
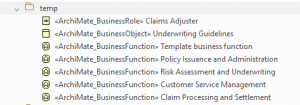
Visualizing what data you just created could be quite hard: there are only 4 new business functions, but they each have a few connections, and this makes for a busy diagram.
To see all the new data, select ‘Draw diagram from sheet’![]() in the eaSheets menu.
in the eaSheets menu.
This will show all the business functions and their related elements. (You will need to do some reorganizing to make the diagram look sensible).
Ours looked like this:
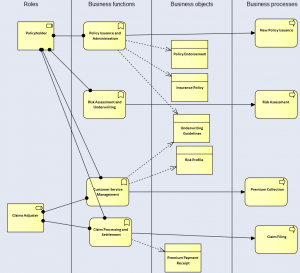
Quite a busy diagram. We think the sheet is easier to understand.
Just to prove that the sheet and the diagram are synchronized (they both come from the same model, so they should be), try deleting a connector from the diagram, then refreshing the sheet: data will disappear from one of the related element columns.
Now try adding the connector back – but which connector type to use? Much easier to to type the name of the target element, or right-click on the appropriate cell, and choose ‘add related element’. eaSheets will take care to create a connector of the correct type.
You could now tidy this data up, and put the template back with all the others, and the new functions, roles and object in their respective folders.
Validating a Sheet
You can validate the data in a sheet – even a Smart Sheet – using the rules in a Model Expert Reference Model.
Using the eaTeamWorks example model, and the Sheet Data 1 / Requirements package:
- Restore the package to the original state (just in case you have made some of the changes we described above).
- Right-click on the ‘Sheet data 1’ package, and choose Package Control/ Package baselines, and restore ‘V1 – start of walkthrough’
- Now open a Smart Sheet on the Requirements package
- To validate it, choose the Model Expert menu option ‘Check with Model Expert’
- Now choose which Reference Model you want to use to check it.
- Pick the ‘Analysis 2’ model, which is designed to check this kind of data
- Model Expert will annotate the Smart Sheet with some errors in the sheet data
- To see the error details, right-click on any of the colored cells to see details of the error.
- The errors should be:
- Some ‘notes’ missing from one requirement
- another requirement which has a ‘Business priority’ of ‘VH’ – the Reference Model only allows ‘H’,’M’ or ‘L,
- Another wi th a missing Business priority
- Several which have no ‘Actor’. This is because the ‘Analysis 2’ Reference Model is setup to require a connection to a business actor.
- You can now repair the data by either
- Typing values for the missing or incorrect fields of tagged values
- Where the cell represents a connection, choose ‘add related element’